Author: Suzan Voga-Duffee

Create, validate, and assign deployment profiles – Deploy and upgrade operating systems

Create, validate, and assign deployment profiles

You use Deployment Profiles to customize the OOBE for a device or group of devices when using Windows Autopilot. You can create a single default deployment profile of settings for your whole organization, or you can create additional deployment profiles and assign them to device groups.

New functionality has been added to Windows Autopilot with each release of Windows, and this is likely to continue. In Table 1-11, you can review how each version of Windows 10 since Version 1803 has introduced changes to how the Autopilot profile is downloaded.

TABLE 1-11 Windows Autopilot profile download

Windows 10 versionProfile download behavior
1803The Autopilot profile is downloaded as soon as possible. When using a wired connection, this is downloaded at the start of OOBE. If wireless, it is downloaded after the network connection page is displayed.
1809The Autopilot profile is downloaded as soon as possible, and it is downloaded again after each reboot.
1903White glove deployment added. Enables partners or IT support staff to pre-provision devices. Autopilot is now self-updating during OOBE. Sets the diagnostics data level to Full during OOBE.
1909No specific improvements to Autopilot.
2004Supports user-driven Hybrid Azure Active Directory join with VPN support (made available for 1903 and 1909). If the device is connected to Ethernet, language, locale, and keyboard pages are skipped in OOBE if configured in the profile.
20H1Support for HoloLens deployments and for co-management.
21H2Improvements to diagnostics collection and role-based access control for Autopilot administrators.

Note Force Autopilot Profile to Be Downloaded

If a device has not downloaded an Autopilot profile, you should reboot the device during OOBE to allow the device to retrieve the profile. You can press Shift-F10 to open a command prompt at the start of the OOBE and then enter shutdown /r /t 0 to restart the device immediately, or enter shutdown /s /t 0 to shut down immediately.

At the time of this writing, the available profile settings that you can configure within a Windows Autopilot deployment profile are shown in Table 1-12.

TABLE 1-12 Windows Autopilot deployment profile settings

Profile settingDescription
Convert All Targeted Devices To AutopilotEnables you to register all targeted devices to Autopilot if not already registered. The next time registered devices go through the OOBE, they go through the assigned Autopilot scenario.
Deployment ModeUser-driven devices are devices that are associated with the user enrolling the device. Self-Deploying (preview) devices have no user affinity; an example is a kiosk device. If this setting is chosen, the following settings are enabled: Skip Work Or Home Usage SelectionSkip OEM Registration And OneDrive ConfigurationSkip User Authentication In OOBE
Join To Azure AD AsAzure AD–joined = Cloud-only Hybrid Azure AD–joined = Cloud and on-premises Windows Server Active Directory
Microsoft Software License TermsThis means that organizations accept the software license terms on behalf of their users.
Privacy SettingsOrganizations can choose not to ask users about Microsoft-related privacy settings during the OOBE process.
Hide Change Account OptionsRemoves the option for users to restart the OOBE process with a different account. (Requires Windows 10 1809 or later.)
User Account TypeTypically, during the OOBE process, a device will automatically be set up with administrator access. This option can be disabled when using Windows Autopilot as you can choose a Standard or Administrator account type.
Allow White Glove OOBEEnables a partner or IT pro to press the Windows key five times during OOBE to run without user authentication, enroll the device, and provision all system-context apps and settings.
Language (Region)Enables you to select the appropriate regional settings. The keyboard is automatically selected based on this selection unless you choose otherwise. Defaults to Operating System default.
Automatically Configure KeyboardIf Yes, uses the regional selection to choose keyboard layout.
Apply Device Name TemplateAllows you to specify a naming convention to automatically name devices. For example, Contoso-%RAND:3% will generate a device name such as Contoso-565.

Note Company Branding is Required for Autopilot

You will notice that Autopilot profiles allow you to choose whether a user is presented with the company branding during OOBE. This setting is optional in each profile you create. Regardless of how you configure deployment profiles, you must configure Azure Active Directory Company Branding.

Use the following procedure to create a deployment profile using Microsoft Intune for a user-driven device that is to be joined to Azure AD:

  1. Open the Microsoft Endpoint Manager admin center and sign in as a global admin.
  2. Select Devices, select Enroll devices, and then select the Automatic Enrollment tile.
  3. Ensure the MDM user scope is not set to None.
  4. Go back to Enroll devices and select Deployment Profiles.
  5. Select Create profile and choose Windows PC.
  6. On the Create profile page, on the Basics tab, enter a profile name and optional description.
  7. Select Next, and then, on the Out-of-box experience (OOBE) tab, displayed in Figure 1-9, configure the values described in Table 1-12 and then select Next.

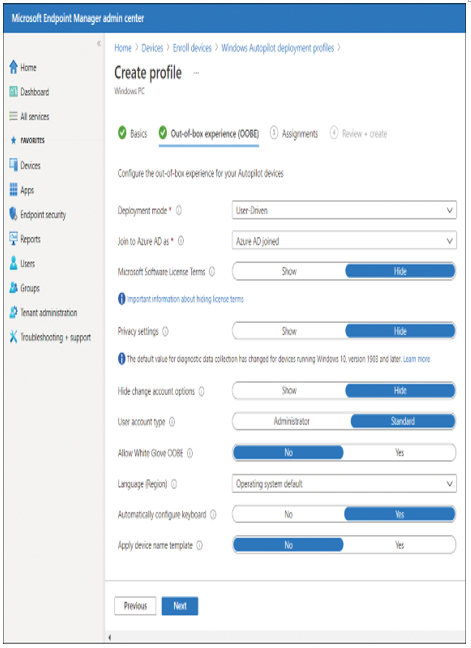
Figure 1-9 Creating an Autopilot profile

  1. On the Assignments page, choose the device groups you want to include or exclude, or choose Add all devices. Then select Next.
  2. On the Review + create tab, select Create.

After you’ve assigned the profile, devices are allocated to the profile during the Windows Autopilot process.

Extract device hardware information – Deploy and upgrade operating systems

Extract device hardware information

The next stage of configuring Windows Autopilot is to extract the device hardware information so that the Autopilot service can recognize devices that will be provisioned using Windows Autopilot.

The device-specific information, which includes hardware device IDs of the devices, needs to be uploaded to Microsoft Intune or to the Microsoft Store for Business, and then synchronized to the Windows Autopilot Deployment Service. You will learn how to upload this information in the next section.

Typically, the hardware vendor that supplied the new devices will upload the device-specific information and associate that information with your organization’s Microsoft 365 tenant. If an organization works closely with a Cloud Solution Provider (CSP) partner, then the vendor may pass the file to it for subsequent uploading via the Partner Center.

Alternatively, the vendor can provide you with a list of the required device information in .csv file format so that you can upload the information.

Another useful method is for the organization to extract the device-specific information from devices by running a Windows PowerShell script. This is especially useful if you are deploying a small number of devices using Windows Autopilot (for example, in a test lab environment or if you are reusing existing devices).

You can extract the hardware ID (or hardware hash) from any existing device that is running Windows 10. Use the Get-WindowsAutoPilotInfo.ps1 PowerShell script, which has been published to the PowerShell Gallery website at https://www.powershellgallery.com/packages/Get-WindowsAutoPilotInfo.

The following script must be run on each computer from an elevated Windows PowerShell prompt:

Click here to view code image

md c:\HWID
Set-Location c:\HWID
Set-ExecutionPolicy Unrestricted
Install-Script -Name Get-WindowsAutoPilotInfo
Get-WindowsAutoPilotInfo.ps1 -OutputFile DeviceID.csv

Once the output file has been created, you can save it to a location such as a USB drive or network share. You must then import the file to your organization’s preferred cloud service, as discussed in the following section.

Note System Center Configuration Manager

It is possible to collect the hardware ID from existing devices by using Configuration Manager, Current Branch Version 1802 or later. This information is automatically collected by Configuration Manager and made available in a new report called Windows Autopilot Device Information. Visit the Microsoft website to understand how to access this report. See https://docs.microsoft.com/sccm/core/plan-design/changes/whats-new-in-version-1802#report-on-windows-autopilot-device-information.

Import device hardware information to cloud service – Deploy and upgrade operating systems

Import device hardware information to cloud service

With the hardware ID for each device, you need to import the information into one of the cloud-based administration centers and then synchronize this information to the Windows Autopilot deployment service.

Devices must be known to Azure AD and registered to your tenant before you can provision the devices using Autopilot.

There are a number of administrative portals that you can use to import the hardware device IDs. However, generally, you’ll use one of the following:

  • Microsoft Endpoint Manager Admin Center
  • Microsoft Store for Business

Use the following procedure to add Windows Autopilot devices to a Microsoft 365 tenant by importing a CSV file with its information:

  1. Open the Microsoft Endpoint Manager admin center and sign in as a global admin.
  2. Select Devices, select Enroll devices, and then select the Devices tile.
  3. On the Windows Autopilot devices page, select Import.
  4. On the Add Windows Autopilot devices blade, browse to a .csv file containing the hardware IDs of the devices you want to add, and select Open.
  5. If the imported file displays as correctly formatted, select Import. It can take up to 15 minutes to import and process the file contents. On the Windows Autopilot Devices page, the banner should indicate that the import is in progress and show the elapsed time.
  6. When the import process has completed, select Sync on the menu bar. A banner should indicate that the synchronization is in progress. The process might take a few minutes to complete, depending on how many devices are being synchronized.
  7. Once the sync process has been completed, you will see a notification indicating whether the sync was successful and whether some devices have not been imported. Select Refresh to see the new devices that have been added.
  8. After you’ve imported the relevant device IDs, you can optionally assign specific devices to particular users. On the Windows Autopilot devices page, select the device check box, and then select Assign user on the toolbar.
  9. On the Select user blade, choose the appropriate user, and then click Select.
  10. On the device ID blade, select Save.

Deploy Windows 10 – Deploy and upgrade operating systems

Deploy Windows 10

When you have imported all your devices, you are ready to deploy Windows 10 using Autopilot. Remember, though, that really you’re provisioning the devices rather than deploying Windows to them. Your users will start the process when you send them their new computers.

When a user turns on their new computer, it starts the OOBE. The user is prompted to connect the device to a wireless network if the device is not connected automatically.

If you chose to assign a specific device to a particular user, as displayed in Figure 1-10, the next prompt the user receives is to enter their password. If you didn’t assign the device to a particular user, the user is prompted for their username and their password.

Figure 1-10 The Account tab in the OOBE process for an Autopilot device

After they’ve entered the required credentials, the device is Azure AD joined and enrolled in MDM. Intune then applies the necessary device configuration profiles, compliance and conditional access policies, and any other configured settings.

Depending on settings, the user might be prompted for additional authentication for device verification. This might take the form of a text message with a one-time code, or else verifying the Azure AD join activity by using the Microsoft Authenticator app.

When the device has been provisioned, as displayed in Figure 1-11, the user desktop displays.

Figure 1-11 An Autopilot device is enrolled in Intune and provisioned

Note Enrollment Status Page

You can configure the enrollment status page for specific groups. During enrollment, while devices are provisioned, you can control what the user sees, and whether users can bypass the provisioning and gain early access to their desktop. Provisioning then continues while the user is signed in.

Troubleshoot deployment – Deploy and upgrade operating systems

Troubleshoot deployment

Before you can resolve an issue with Windows Autopilot, you need to identify in which part of the overall process the problem is occurring. The Windows Autopilot process can be broken down into logical stages:

  • Network connectivity Establish an internet connection and connect to the Windows Autopilot service.
  • Deployment profile and OOBE A deployment profile will be delivered to the device to manage the OOBE. The OOBE will complete using the settings within the deployment profile.
  • Azure AD Has Azure AD been configured correctly? For user-driven deployments, users need to enter their Azure AD credentials to join the device to Azure AD.
  • MDM enrollment issues After being auto-enrolled into the MDM service, any policies, settings, and apps will be delivered to the device.

The whole process should result in the device being set up, configured, and ready for the user to be productive.

For a summary of possible troubleshooting areas within these stages, review Table 1-13.

TABLE 1-13 Windows Autopilot process flow

ProcessTroubleshooting
Network connectivityEnsure that the device can access the Windows Autopilot services:
Windows Autopilot requires internet access.
Ensure that specific network requirements are met, including firewall port settings and DNS name resolution.
Deployment profile and OOBEThere are settings in the deployment profile that configure the Out-Of-Box Experience. You should focus your troubleshooting on whether
The device has received its deployment profile.
A deployment profile has been assigned to the device.
The correct deployment profile type has been assigned to the device; for example, is the device a kiosk?
The assigned deployment profile settings are correct; for example, has the Administrator account creation been configured by accident?
Azure ADAzure AD needs to be configured prior to deploying devices with Windows Autopilot. Focus your troubleshooting on the following things:
Ensure that MDM auto-enrollment in Azure AD is correctly configured.
Ensure that the MDM discovery URL is correctly configured, so devices can find the MDM service.Ensure that Azure AD custom branding is in place.
Ensure that device hardware IDs have been successfully synchronized to the Windows Autopilot deployment service.Ensure that the user has a valid Azure AD account.
Ensure that user has not exceeded the maximum number of devices allowed to be joined to Azure AD.
If a third-party MDM solution is being used, make sure it has been correctly authorized in Azure AD.
MDM enrollment issuesIn the final stage of the Windows Autopilot process, the device will be enrolled into Mobile Device Management. If MDM fails, then policies, settings, and apps will not be deployed to the device. You should focus your troubleshooting on the following things:
The Enrollment Status Page is useful for troubleshooting MDM issues.
Has the user been assigned an Enterprise Mobility + Security license?
Ensure that users have not exceeded their device enrollment limits.

Note Time

If you have ensured that the configuration is correct, then wait. Maybe go grab a coffee. Nearly all issues that I have experienced, such as the new device not being recognized by the Autopilot service, can be resolved by waiting 15 minutes and rebooting the device. Remember that Autopilot uses the cloud, and Azure AD group membership propagation or device ID synchronization can sometimes take a little longer to update.

Error codes – Deploy and upgrade operating systems

Error codes

Whenever a major issue occurs when using Windows Autopilot, an error code will be generated. Some error codes can be viewed on the device whenever a problem occurs during setup. Also, error codes can be viewed using the Event Trace for Windows tool.

Some common error codes relating to Windows Autopilot are shown in Table 1-14.

TABLE 1-14 Windows Autopilot error codes

Error codeDescription
0x800705B4This error is caused by the device being either a virtual machine or not having TPM 2.0; therefore, the device is not capable of running Autopilot in self-deploying mode.
0x801c03eaThis error means that the device is TPM 2.0 capable but that the TPM still needs to be upgraded from 1.2 to 2.0.
0x801c0003The error page will report this error code with a message reading, “Something went wrong,” which indicates that the Azure AD join failed.
0x80180018The error page will report this error code with a message reading, “Something went wrong,” which indicates the MDM enrollment failed.
0x80070032When Windows Autopilot Reset is used to prepare existing devices to become business ready, you should confirm that the Windows Recovery Environment (WinRE) is correctly configured and enabled on the device; otherwise, you will get this error.

When troubleshooting, other sources of information include looking in the Event Viewer for issues relating to the deployment profile settings and the OOBE. The relevant logs are located here:

Click here to view code image

Application and Services Logs –> Microsoft –> Windows –> Provisioning-Diagnostics-
Provider –> AutoPilot.

An example log entry might read, “Autopilot policy name not found.”

Need More Review? Reviewing Event Log Entries

If you want to know more about the event log entries related to troubleshooting Autopilot profile settings and OOBE flow, visit the Microsoft website at https://docs.microsoft.com/windows/deployment/windows-autopilot/troubleshooting.

You can also look in the registry to find evidence of Windows Autopilot failures. The Auto-pilot deployment service will record information in the registry at this location:

Click here to view code image

HKLM\SOFTWARE\Microsoft\Provisioning\Diagnostics\AutoPilot

An example of a problem recorded in the registry would read, “The device has not been registered with Autopilot.”

For more advanced troubleshooting, administrators can use the Event Tracing for Windows (ETW) tool to capture detailed information from Autopilot. This will generate trace files, which you can view by using the Windows Performance Analyzer.

Note Support Case for Windows Autopilot

If you have an issue that you cannot resolve, you can obtain help by contacting Microsoft Support and opening a support case for Windows Autopilot at https://docs.microsoft.com/windows/deployment/windows-autopilot/autopilot-support.

Plan and implement Windows 10 using MDT – Deploy and upgrade operating systems

Skill 1.3: Plan and implement Windows 10 using MDT

MDT is a deployment tool used by many organizations to provide for LTI deployments in on-premises infrastructures. When combined with Endpoint Configuration Manager, you can implement ZTI deployments. In this skill, you’ll learn what you need to know about when and how to use MDT to deploy Windows 10 in your organization.

This skill covers how to:

Choose configuration options based on requirements

Most enterprise organizations have used image-based deployment for many years. Both MDT and Configuration Manager rely on images. When working with images, you must determine whether you want to use a default image, or a custom image to deploy the Windows operating system:

  • Default image A default image is the result of performing a standard installation of Windows 10 on a computer using default values. A default image, install.wim, is provided in the Sources folder on the Windows 10 product DVD. When using default images, remember that:
    • You don’t need to create the image.
    • You must apply settings and apps separately after deployment of the image.
    • Updates to applications don’t affect the image.
    • The same image can be used throughout the organization.
    • End-to-end deployment time is longer than with custom images because you must perform deployment tasks after image application.
  • Custom image A custom image is one that contains additional components, such as drivers and apps, and specific settings and customizations relevant for the organization. When using custom images, remember that:
    • You’ll need to create and maintain the image.
    • You can include all required apps and settings in the image.
    • You might need to maintain multiple images to manage the needs of your different departments.
    • Updates to applications require you to update the image.
    • End-to-end deployment time can be faster.

Note Thin Versus Thick

Images that contain only an operating system are often referred to as thin images, while those that contain many apps are called thick images. Most organizations use thin images because they require less ongoing maintenance.

MDT supports two types of images. These are:

  • Boot images These are used to start the deployment process. It’s fairly typical for computers targeted for deployment with MDT to have no installed operating system. This is known as bare-metal deployment. The boot image can be accessed from a USB thumb drive, a DVD or ISO file, or by using a Pre-Boot Execution Environment (PXE) server (such as Windows Deployment Services). When you deploy MDT, you’ll also install Windows ADK. This includes standard boot images for both x86 and x64 architectures.
  • Operating system images You’ll use the deployment workbench to create and manage your operating system images. As mentioned, you can use either a default or custom image, depending on your requirements.

Create and manage images – Deploy and upgrade operating systems

Create and manage images

Before you can do anything else. You’ll need to create your images. The starting point is a reference image. The reference image is the standard operating system that you’ll deliver to your users. You’ll have to consider what you want to add to the image; for example, adding drivers, apps, or specific configurations.

Create a reference image

After you’ve determined what will be included in the image, you’ll need to create it. Use the following procedure:

  1. On a reference computer, install Windows 10.
  2. Apply any Windows updates.
  3. Add any drivers, apps, or other required software.
  4. Apply any app updates.
  5. Configure any installed apps or software as needed.
  6. Generalize the image.

Exam Tip

You use the Sysprep.exe program to generalize your image. It’s located in the C:\Windows\System32\Sysprep\ folder.

7. Capture the generalized image.

8. Store the captured image in a location accessible to MDT.

In addition to your operating system image, you’ll also need a boot image. Typically, you’ll use the boot image provided on the Windows 10 product DVD or ISO.

Need More Review? Create a Windows 10 Reference Image

To review further details about reference image creation, refer to the Microsoft website at https://docs.microsoft.com/windows/deployment/deploy-windows-mdt/create-a-windows-10-reference-image.

Add the images to MDT

After you’ve created any required images, the next step is to add the images to MDT. Before you can add images, you’ll need to create a deployment share. Use the following procedure:

  1. Open the Deployment Workbench.
  2. Select the Deployment Shares folder.
  3. Right-click Deployment Shares and then select New Deployment Share.
  4. Complete the New Deployment Share Wizard by providing the following:
  • A local path on the MDT server for the share.
    • A share name, such as Deployment Share$.
    • A description.
    • Options that control the deployment experience when images are applied:
      • Ask if a computer backup should be performed.
      • Ask for a product key.
      • Ask to set the local Administrator password.
      • Ask if an image should be captured.
      • Ask if BitLocker should be enabled.

When you’ve created the deployment share, you can add your images to it.

To add an operating system image, use the following procedure:

  1. Expand your deployment share and select Operating Systems.
  2. Right-click Operating Systems and then select Import Operating System.
  3. Complete the Import Operating System Wizard, displayed in Figure 1-12, by entering the following information:

Figure 1-12 Choosing the operating system image type

  • Choose between Full set of source files, Custom image file, and Windows Deployment Services image.
    • The source location for your image.
    • A WDS server name, if you’re using a Windows Deployment Services image.
    • A destination directory name.

Manage application and driver deployment – Deploy and upgrade operating systems

Manage application and driver deployment

You can use MDT to deploy and manage apps and drivers. To add applications, use the following procedure:

  1. In your deployment share, select and then right-click Applications.
  2. Select New Application.
  3. Complete the New Application Wizard by entering the following information:
  • Choose between Application with source files, Application without source files or elsewhere on the network, or Application bundle.
    • The details for the app, including Publisher, Application Name, Version, and Language.
    • The Source (where the files are for the app) and the Destination (the name by which the app is known).
    • Any command-line details needed to install the app. For example, for XML Notepad, the command line would typically be xmlnotepad.msi /q.

Exam Tip

If you want to deploy many apps, consider using a Windows PowerShell script to accelerate the process. You’ll need to import the MicrosoftDeploymentToolkit module.

Installing drivers is pretty similar:

  1. Select and then right-click the Out-of-Box Drivers folder.
  2. Select Import Drivers.
  3. Specify the folder location for drivers you want to import.

Create and use task sequences

After you’ve added all the required images, apps, and drivers, you must create task sequences to apply these to target computers. Task sequences are the collection of actions performed to complete a specific job, such as deploy Windows 10 and related apps to a target computer.

You use predefined templates to create your task sequences. Tasks typically include the following:

  • Gather This task reads required configuration information from a deployment server.
  • Format and Partition This task prepares the target hard disk for the operating system you’re deploying.
  • Inject Drivers This task obtains the required drivers for a target computer and downloads them from a driver repository.
  • Apply Operating System This task deploys the appropriate operating system image.
  • Windows Update This task connects to a WSUS server and retrieves updates to apply to the target computer.

To create a task sequence, use the following procedure:

  1. In your deployment share, select and then right-click Task Sequences.
  2. Select New Task Sequence.
  3. Complete the New Task Sequence Wizard by entering the following information:
  • A Task sequence ID and Task sequence name. These identify the task sequence, and together with optional Task sequence comments, are displayed by the deployment wizard during deployment.
    • Choose a template. You can choose between Sysprep and Capture, Standard Client Task Sequence, Standard Client Upgrade Task Sequence, Post OS Installation Task Sequence, and many others.
    • Choose the Operating Systems image.
    • If necessary, enter a product key.
    • Enter a user Full Name, Organization, web browser home page, and local administrator account password.

After you’ve created the task sequence, you’ll need to configure its settings. The procedure will vary based on what the task sequence does. But for example, to complete the process of configuring an operating system deployment task sequence, use the following procedure:

  1. In your deployment share, in the Task Sequences folder, right-click your task sequence and select Properties.
  2. Select the Task Sequence tab, displayed in Figure 1-13.

Figure 1-13 Reviewing the task sequence details

3. Verify and modify any required settings.

The final step before deployment is to configure the deployment share properties and related Windows PE settings. Use the following procedure:

  1. Right-click your deployment share and select Properties.
  2. On the General tab, verify the Platforms Supported (x86 and x64).
  3. Optionally, select the Enable multicast for this deployment share check box. This is only available if you’ve deployed a Windows Deployment Services role in your environment.
  4. On the Rules tab, review the contents of the displayed CustomSettings.ini file. These were defined in the initial task sequence creation.
  5. On the Windows PE tab, review the settings for creating a Windows PE boot disk. Remember to review the settings for your platform by selecting either x86 or x64 in the Platform list.
  6. On the Windows PE tab, beneath the Platform list, select the Features tab and review and revise required settings. These options determine additional features.
  7. Select OK, and if you made any changes, right-click your deployment share and select Update Deployment Share. Complete the wizard to refresh the settings in your deployment share.

Deploy images – Deploy and upgrade operating systems

Deploy images

After you’ve completed the process of creating and configuring your task sequences, you’re ready to deploy your images. All you need to do is start the required computers, and they should start up using the MDT PE. Then use the following procedure to apply the image and deploy Windows 10. Note that steps might vary based on your specific configuration options:

  1. Turn on your target computer.
  2. The Microsoft Deployment Toolkit deployment wizard starts.
  3. As displayed in Figure 1-14, select Run the Deployment Wizard to install a new Operating System.

Figure 1-14 Deploying Windows 10 using an MDT task sequence

  1. Enter your User name, Password, and Domain and select OK.
  2. On the Task Sequence page, select the appropriate task sequence and select Next.
  3. On the Computer Details page, review the generated computer name, and then select either Join a domain or Join a workgroup. For the domain option, enter the Domain to join, Organizational Unit, and credentials to join (User Name, Password, and Domain). Select Next.
  4. Complete the Windows Deployment Wizard by entering the following information:
  • Choose whether to move user data and settings from a previous version of Windows.
    • Choose whether to restore user data.
    • Specify the Language Settings and Time Settings.
    • Select any apps you want to deploy.

8. When you’ve completed the required settings, select Begin. Your operating system and selected apps are deployed.

Need More Review? Deploy a Windows 10 Image Using MDT

To review further details about deploying images with MDT, refer to the Microsoft website at https://docs.microsoft.com/windows/deployment/deploy-windows-mdt/deploy-a-windows-10-image-using-mdt.