Category Archive : Enable VPN Reconnect

Configure Windows Hello and Windows Hello for Business – Deploy and upgrade operating systems

Configure Windows Hello and Windows Hello for Business

Windows Hello is a two-factor biometric authentication mechanism built into Windows 10. The personal biometric data created and used by Windows Hello is unique to the device on which it is set up, and it is not synced with other devices. Windows Hello allows users to unlock their devices by using facial recognition, fingerprint scanning, or a PIN.

Windows Hello for Business is the enterprise implementation of Windows Hello; it allows users to authenticate to Active Directory or Azure AD, and it enables users to access network resources. Administrators can configure Windows Hello for Business using Group Policy or by using mobile device management policy; it uses asymmetric (public/private key) or certificate-based authentication.

Windows Hello provides the following benefits:

  • Strong passwords can be difficult to remember, and users often reuse passwords on multiple sites, which reduces security. Windows Hello allows them to authenticate using their biometric data.
  • Passwords are vulnerable to replay attacks, and server breaches can expose password-based credentials.
  • Passwords offer less security because users can inadvertently expose their passwords because of phishing attacks.
  • Windows Hello helps protect against credential theft. Because a malicious person must have both the device and the biometric information or PIN, it becomes more difficult to hack the authentication process.
  • Windows Hello can be used in cloud-only and hybrid-cloud deployment scenarios.
  • Windows Hello logs you into your devices three times faster than by using a password.

To implement Windows Hello, your devices must be equipped with the appropriate hardware. For example, facial recognition requires that you use special cameras that see in infrared (IR) light. These can be external cameras or cameras incorporated into the device. The cameras can reliably tell the difference between a photograph or scan, and a living person. For fingerprint recognition, your devices must be equipped with fingerprint readers, which can be external or integrated into laptops or USB keyboards.

If you have previously experienced poor reliability from legacy fingerprint readers, you should review the current generation of sensors, which offer significantly better reliability and are less error prone.

After you have installed the necessary hardware devices, use these directions to set up Windows Hello:

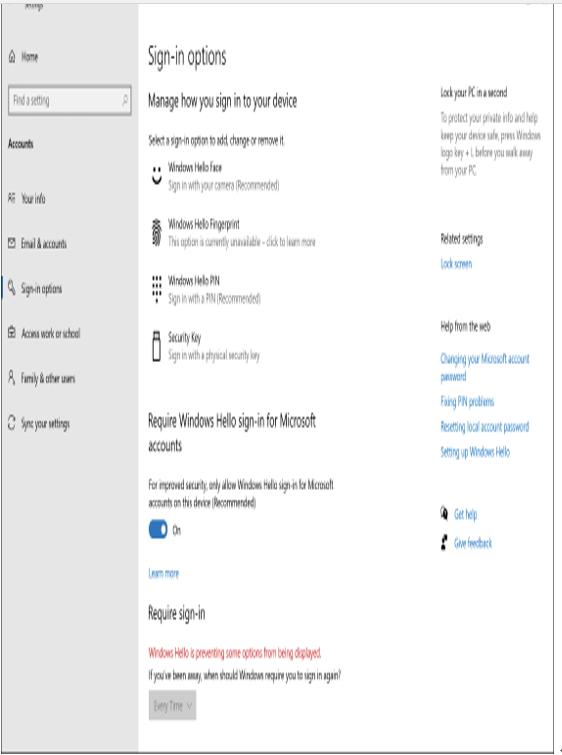
  1. Open the Settings app and select Accounts.
  2. On the Sign-in options page, under Manage how you sign in to your device, review the options for face or fingerprint. (If you do not have Windows Hello-supported hardware, the Windows Hello section does not appear on the Sign-in Options page.)

To configure Windows Hello, follow these steps:

  1. Under the Windows Hello section, select Windows Hello Face, and then select Set up.
  2. On the Welcome to Windows Hello page, select Get started.
  3. When prompted, enter your PIN or password to confirm your identity.
  4. Allow Windows Hello to capture your facial features, as shown in Figure 1-19.

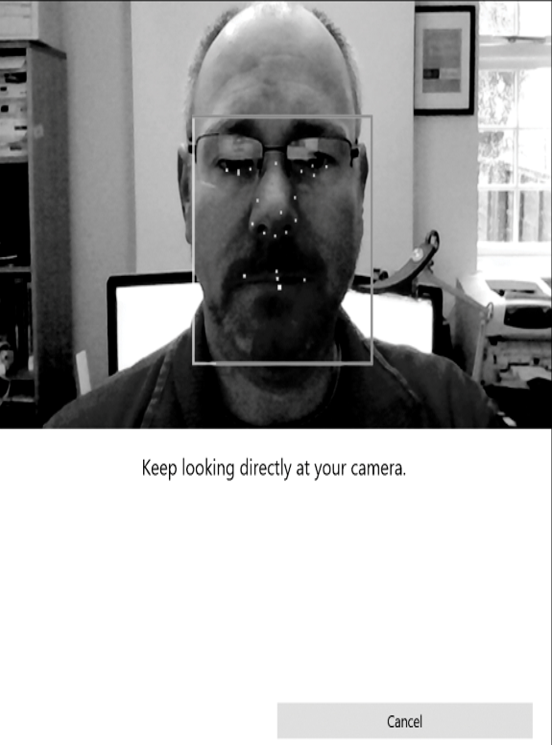
Figure 1-19 Configuring Windows Hello

5. Once complete, you are presented with an All Set! message that you can close.

Users can use Windows Hello for a convenient and secure sign-in method, which is tied to the device on which it is set up.

For enterprises who want to enable Windows Hello, they can configure and manage Windows Hello for Business. Windows Hello for Business uses key-based or certificate-based authentication for users by using Group Policy or by using a modern management approach, such as Microsoft Intune.

To manage Windows Hello for Business with Group Policy, you should review the two Windows Hello for Business GPO settings, which can be found in this node: User Configuration > Administrative Templates > Windows Components > Windows Hello for Business.

One setting is used to enable Windows Hello for Business, and the other setting is used to configure the use of certificates for on-premises authentication.

You also have additional Windows Hello for Business GPO settings available to manage your Windows Hello for Business deployment. These policies can be found in this node: Computer Configuration > Administrative Templates > Windows Components > Windows Hello for Business.

There are ten settings that allow you to configure hardware security devices, such as TPM. These settings also allow you to configure smart cards, biometrics settings, and more.

Need More Review? Windows Hello Biometrics in the Enterprise

To review further details about using Windows Hello in the enterprise, refer to the Microsoft website at https://docs.microsoft.com/windows/access-protection/hello-for-business/hello-biometrics-in-enterprise.

Manage Windows Hello for Business with Intune – Deploy and upgrade operating systems

Manage Windows Hello for Business with Intune

Windows Hello for Business can be deployed using a device configuration profile, which allows you to configure various settings on Windows 10.

With Intune device configuration profiles, you can permit or block the use of Windows Hello for Business, and you can configure the following settings:

  • Minimum PIN Length
  • Maximum PIN Length
  • Lowercase Letters In PIN
  • Uppercase Letters In PIN
  • Special Characters In PIN
  • PIN Expiration (Days)
  • Remember PIN History
  • Enable PIN Recovery
  • Use A Trusted Platform Module
  • Allow Biometric Authentication
  • Use Enhanced Anti-Spoofing When Available
  • Certificate For On-Premises Resources

You can also use Intune device enrollment policies to configure Windows Hello for Business settings during the initial device enrollment into management.

Configure PIN

To avoid sign in using passwords, Microsoft provides an authentication method that uses a PIN in association with Windows Hello. When you initially set up Windows Hello, you’re first asked to create a PIN. This PIN enables you to sign in using the PIN as an alternative—such as when you can’t use your preferred existing biometric method because of an injury, because the sensor is unavailable, or because the sensor is not working properly. The PIN provides the same level of protection as Windows Hello.

Windows Hello PIN provides secure authentication without sending a password to an authenticating authority, such as Azure AD or an AD DS domain controller. Windows Hello for Business provides enterprises compliance with the latest FIDO 2.0 (Fast Identity Online) framework for end-to-end multifactor authentication.

If the user does not use Windows Hello for Business, then the user cannot use an associated PIN. Within a domain environment, a user cannot use a PIN on its own. (This method of sign-in is known as a Convenience PIN.) You will see from the user interface displayed in Figure 1-20 that the PIN settings are within the Windows Hello section of the Sign-In Options. A user must first configure Windows Hello and be already signed in using a local account, a domain account, a Microsoft account, or an Azure AD account. The user is then able to set up PIN authentication, which is associated with the credential for the account.

Figure 1-20 Configuring Windows sign-in options

After a user has completed the registration process, Windows Hello for Business performs the following operations to secure the credentials:

  1. Generates a new public-private key pair on the device known as a protector key.
  2. If installed in the device, the TPM is used to generate and store this protector key.
  3. If the device does not have a TPM, the Windows 10 operating system encrypts the protector key and stores it within the file system.
  4. Windows Hello for Business also generates an administrative key that is used to reset credentials if necessary.

Note Pairing of Credentials and Devices

Windows Hello for Business pairs a specific device and a user credential. Consequently, the PIN the user chooses is associated only with the signed-in account and that specific device. A user is unable to sign in on another device unless he or she initiates the Windows Hello setup on the device.

The user now has a PIN gesture defined on the device and an associated protector key for that PIN gesture. The user can now securely sign in to their device using the PIN; also, the user can add support for a biometric gesture as an alternative for the PIN. The gesture can be facial recognition, iris scanning, or fingerprint recognition, depending on available hardware in the device. When a user adds a biometric gesture, it follows the same basic sequence as mentioned earlier. The user authenticates to the system by using the PIN and then registers the new biometric. Windows generates a unique key pair and only stores this on the device. There is no Windows Hello biometric data stored in the Microsoft Cloud.

You can create and implement policies for using Windows Hello for Business in your organization. For example, you can configure a policy that enables or disables the use of biometrics on devices affected by the policy. If allowed to use Windows Hello for Business, a user can then sign in using the PIN or a biometric gesture.

Need More Review? Windows Hello for Business

To review further details about Windows Hello for Business, refer to the Microsoft website at https://docs.microsoft.com/windows/security/identity-protection/hello-for-business/hello-identity-verification.

You can use MDM policies or GPOs to configure settings for Windows Hello for Business.

Note Enhancing the Security of a Pin

When we think of a PIN, we generally think of ATM cash machines and four-digit PINs. When securing Windows 10 with Windows Hello for Business, you can significantly increase the level of security by imposing rules on PINs. For example, a PIN can require or block special characters, uppercase characters, lowercase characters, and digits. A PIN such as t496A? could be a complex Windows Hello PIN. The maximum length that can be set is 127 characters.

To configure PIN complexity with Windows 10 (with and without Windows Hello for Business), you can use the eight PIN Complexity Group Policy settings that allow you to control PIN creation and management.

These policy settings can be deployed to computers or to users. If you deploy Group Policy settings to both, then the user policy settings have precedence over computer policy settings, and GPO conflict resolution is based on the last applied policy. The policy settings included are as follows:

  • Require Digits
  • Require Lowercase Letters
  • Maximum PIN Length
  • Minimum PIN Length
  • Expiration
  • History
  • Require Special Characters
  • Require Uppercase Letters

In Windows 10, the PIN complexity Group Policy settings are located at Administrative Templates > System > PIN Complexity, under both the Computer and User Configuration nodes.

Authenticating remote users – Deploy and upgrade operating systems

Authenticating remote users

Windows users authenticate using Kerberos when accessing the local network, but for remote authentication, this is not suitable; a separate protocol, which protects against network intrusion, must be used. During the initial negotiation sequence (using PPP), when a client connects to the remote computer, each party must agree on a shared authentication protocol to use. By default, Windows 10 will use the strongest protocol that both parties have in common.

In the Add A VPN Connection Wizard, Windows 10 offers three sign-in options when configuring a VPN, such as:

  • Username and password
  • Smart card
  • One-time password

In addition to these options, you can also configure Windows 10 to use the common authentication protocols:

  • EAP-MS-CHAPv2 This is a protocol that uses Extensible Authentication Protocol (EAP), which offers the default and most flexible authentication option for Windows 10 clients. It offers the strongest password-based mechanism for the client side, with certificates being used on the server side. Authentication can be negotiated based on certificates or smart cards, and EAP-MS-CHAPv2 is likely to be further extended and developed as technology advances. Windows 10 aims to use this method for authentication connections where possible. IKEv2 connections must use EAP-MS-CHAPv2 or a certificate.
  • MS-CHAP v2 Stronger than the CHAP protocol, with significantly improved security when partnered with EAP to enable encryption of the password.
  • CHAP Used for down-level client compatibility and has been surpassed by MS-CHAP v2. This protocol uses a pre-shared key between the client and server to enable encryption to take place.
  • PAP This is the least secure protocol as it uses plaintext passwords. It is not considered secure and should only be used whenever other authentication methods cannot be negotiated.

Creating a VPN connection in Network and Sharing Center – Deploy and upgrade operating systems

Creating a VPN connection in Network and Sharing Center

To create a VPN in Windows 10, from the Network and Sharing Center, under Change your network settings, select Set up a new connection or network and then select Connect to a workplace.

To configure your VPN connection, in the Connect to a Workplace wizard, provide the following information:

  • How do you want to connect? You can connect by using an existing internet connection or by dialing directly to your workplace.
  • Internet address This is the name or IP address of the computer that you connect to at your workplace, as shown in Figure 1-22. Typically, this is an FQDN, such as remote.adatum.com.

Figure 1-22 The Connect to a Workplace wizard

  • Destination name This is the name of this VPN connection.

After you have created the VPN connection, from the Network And Sharing Center, select Change adapter settings, right-click your VPN connection, and select Properties. As shown in Figure 1-23, you can then configure additional options as required by your organization’s network infrastructure.

Figure 1-23 The Security tab of a VPN connection

These settings must match the remote access device that your device connects to, and includes the following options:

  • Type of VPN Point-to-Point Tunneling Protocol (PPTP), Layer Two Tunneling Protocol with IPsec (L2TP/IPsec), Secure Socket Tunneling Protocol (SSTP), or Internet Key Exchange version 2 (IKEv2).
  • Data encryption None, Optional, Required, or Maximum Strength.

In the Authentication section, you choose either Use Extensible Authentication Protocol (EAP) or Allow These Protocols. If you choose to use EAP, you then configure one of the following:

  • Microsoft: EAP-AKA (Encryption Enabled)
  • Microsoft: EAP-SIM (Encryption Enabled)
  • Microsoft: EAP-TTLS (Encryption Enabled)
  • Microsoft: Protected EAP (PEAP) (Encryption Enabled)
  • Microsoft: Secured Password (EAP-MSCHAP v2) (Encryption Enabled)
  • Microsoft: Smart Card Or Other Certificate (Encryption Enabled)

If you choose Allow These Protocols, you then configure the following options:

  • Unencrypted Password (PAP)
  • Challenge Handshake Authentication Protocol (CHAP)
  • Microsoft CHAP Version 2 (MS-CHAP v2)
  • Automatically Use My Windows Log-on Name And Password (And Domain, If Any)

Windows Autopilot deployment scenarios – Deploy and upgrade operating systems

Windows Autopilot deployment scenarios

Windows Autopilot simplifies and automates the customization of the Out-Of-Box Experience (OOBE) and seamlessly enrolls your devices to management. Once enrolled into Microsoft Intune, devices are secured, configured, and further managed.

There are several usage scenarios currently available with Windows Autopilot, and additional functionality will be added in the future. You should understand the scenarios shown in Table 1-10 that show when you would use Windows Autopilot as part of your Windows 10 deployment strategy.

TABLE 1-10 Windows Autopilot scenarios

ScenarioDescription
Windows Autopilot for existing devicesDeploy Windows 10 on an existing Windows 7 or Windows 8.1 device. Requires Configuration Manager Current Branch (1806 or later) to replace the operating system and then allow Windows Autopilot to continue.
Windows Autopilot user-driven modeProvision Windows 10 on a new Windows 10 device. Devices will be set up by a member of the organization and configured for that person to use.
Windows Autopilot self-deploying modeUsed for transforming Windows 10 devices that will be automatically configured for use as a kiosk terminal, shared computer, or as a digital sign-age device. Can be performed locally by an administrator or via MDM.
Windows Autopilot ResetUsed to redeploy a Windows 10 device. The reset process removes personal files, apps, and settings, and it reapplies a device’s original settings. The connection to Azure AD and Microsoft Intune is retained. A user can sign in to the device using their Azure AD credentials and be productive immediately.

When comparing Autopilot to traditional on-premises deployment methods, such as imaging, there are clear advantages:

  • Windows images are not required.
  • Drivers are included with Windows 10 and are pre-installed on the device.
  • No on-premises deployment infrastructure is required (except if using Windows Autopilot for existing devices).

In the next section, you will learn that devices must have a connection to the internet to use Window Autopilot. If internet access is not available for the Windows Autopilot deployment, then you will need to select an alternative deployment method.

As long as an organization uses cloud-based services—such as Microsoft 365, which includes Azure AD and Microsoft Intune—they will be able to benefit from

  • Joining devices to Azure AD automatically.
  • Auto-enrolling your devices into Microsoft Intune.
  • Lower provisioning costs.
  • Restricted Administrator account creation during OOBE.
  • Agile deployment of Windows 10 devices.
  • Accelerating user productivity.

Extract device hardware information – Deploy and upgrade operating systems

Extract device hardware information

The next stage of configuring Windows Autopilot is to extract the device hardware information so that the Autopilot service can recognize devices that will be provisioned using Windows Autopilot.

The device-specific information, which includes hardware device IDs of the devices, needs to be uploaded to Microsoft Intune or to the Microsoft Store for Business, and then synchronized to the Windows Autopilot Deployment Service. You will learn how to upload this information in the next section.

Typically, the hardware vendor that supplied the new devices will upload the device-specific information and associate that information with your organization’s Microsoft 365 tenant. If an organization works closely with a Cloud Solution Provider (CSP) partner, then the vendor may pass the file to it for subsequent uploading via the Partner Center.

Alternatively, the vendor can provide you with a list of the required device information in .csv file format so that you can upload the information.

Another useful method is for the organization to extract the device-specific information from devices by running a Windows PowerShell script. This is especially useful if you are deploying a small number of devices using Windows Autopilot (for example, in a test lab environment or if you are reusing existing devices).

You can extract the hardware ID (or hardware hash) from any existing device that is running Windows 10. Use the Get-WindowsAutoPilotInfo.ps1 PowerShell script, which has been published to the PowerShell Gallery website at https://www.powershellgallery.com/packages/Get-WindowsAutoPilotInfo.

The following script must be run on each computer from an elevated Windows PowerShell prompt:

Click here to view code image

md c:\HWID
Set-Location c:\HWID
Set-ExecutionPolicy Unrestricted
Install-Script -Name Get-WindowsAutoPilotInfo
Get-WindowsAutoPilotInfo.ps1 -OutputFile DeviceID.csv

Once the output file has been created, you can save it to a location such as a USB drive or network share. You must then import the file to your organization’s preferred cloud service, as discussed in the following section.

Note System Center Configuration Manager

It is possible to collect the hardware ID from existing devices by using Configuration Manager, Current Branch Version 1802 or later. This information is automatically collected by Configuration Manager and made available in a new report called Windows Autopilot Device Information. Visit the Microsoft website to understand how to access this report. See https://docs.microsoft.com/sccm/core/plan-design/changes/whats-new-in-version-1802#report-on-windows-autopilot-device-information.

Deploy Windows 10 – Deploy and upgrade operating systems

Deploy Windows 10

When you have imported all your devices, you are ready to deploy Windows 10 using Autopilot. Remember, though, that really you’re provisioning the devices rather than deploying Windows to them. Your users will start the process when you send them their new computers.

When a user turns on their new computer, it starts the OOBE. The user is prompted to connect the device to a wireless network if the device is not connected automatically.

If you chose to assign a specific device to a particular user, as displayed in Figure 1-10, the next prompt the user receives is to enter their password. If you didn’t assign the device to a particular user, the user is prompted for their username and their password.

Figure 1-10 The Account tab in the OOBE process for an Autopilot device

After they’ve entered the required credentials, the device is Azure AD joined and enrolled in MDM. Intune then applies the necessary device configuration profiles, compliance and conditional access policies, and any other configured settings.

Depending on settings, the user might be prompted for additional authentication for device verification. This might take the form of a text message with a one-time code, or else verifying the Azure AD join activity by using the Microsoft Authenticator app.

When the device has been provisioned, as displayed in Figure 1-11, the user desktop displays.

Figure 1-11 An Autopilot device is enrolled in Intune and provisioned

Note Enrollment Status Page

You can configure the enrollment status page for specific groups. During enrollment, while devices are provisioned, you can control what the user sees, and whether users can bypass the provisioning and gain early access to their desktop. Provisioning then continues while the user is signed in.

Error codes – Deploy and upgrade operating systems

Error codes

Whenever a major issue occurs when using Windows Autopilot, an error code will be generated. Some error codes can be viewed on the device whenever a problem occurs during setup. Also, error codes can be viewed using the Event Trace for Windows tool.

Some common error codes relating to Windows Autopilot are shown in Table 1-14.

TABLE 1-14 Windows Autopilot error codes

Error codeDescription
0x800705B4This error is caused by the device being either a virtual machine or not having TPM 2.0; therefore, the device is not capable of running Autopilot in self-deploying mode.
0x801c03eaThis error means that the device is TPM 2.0 capable but that the TPM still needs to be upgraded from 1.2 to 2.0.
0x801c0003The error page will report this error code with a message reading, “Something went wrong,” which indicates that the Azure AD join failed.
0x80180018The error page will report this error code with a message reading, “Something went wrong,” which indicates the MDM enrollment failed.
0x80070032When Windows Autopilot Reset is used to prepare existing devices to become business ready, you should confirm that the Windows Recovery Environment (WinRE) is correctly configured and enabled on the device; otherwise, you will get this error.

When troubleshooting, other sources of information include looking in the Event Viewer for issues relating to the deployment profile settings and the OOBE. The relevant logs are located here:

Click here to view code image

Application and Services Logs –> Microsoft –> Windows –> Provisioning-Diagnostics-
Provider –> AutoPilot.

An example log entry might read, “Autopilot policy name not found.”

Need More Review? Reviewing Event Log Entries

If you want to know more about the event log entries related to troubleshooting Autopilot profile settings and OOBE flow, visit the Microsoft website at https://docs.microsoft.com/windows/deployment/windows-autopilot/troubleshooting.

You can also look in the registry to find evidence of Windows Autopilot failures. The Auto-pilot deployment service will record information in the registry at this location:

Click here to view code image

HKLM\SOFTWARE\Microsoft\Provisioning\Diagnostics\AutoPilot

An example of a problem recorded in the registry would read, “The device has not been registered with Autopilot.”

For more advanced troubleshooting, administrators can use the Event Tracing for Windows (ETW) tool to capture detailed information from Autopilot. This will generate trace files, which you can view by using the Windows Performance Analyzer.

Note Support Case for Windows Autopilot

If you have an issue that you cannot resolve, you can obtain help by contacting Microsoft Support and opening a support case for Windows Autopilot at https://docs.microsoft.com/windows/deployment/windows-autopilot/autopilot-support.

Plan and implement Windows 10 using MDT – Deploy and upgrade operating systems

Skill 1.3: Plan and implement Windows 10 using MDT

MDT is a deployment tool used by many organizations to provide for LTI deployments in on-premises infrastructures. When combined with Endpoint Configuration Manager, you can implement ZTI deployments. In this skill, you’ll learn what you need to know about when and how to use MDT to deploy Windows 10 in your organization.

This skill covers how to:

Choose configuration options based on requirements

Most enterprise organizations have used image-based deployment for many years. Both MDT and Configuration Manager rely on images. When working with images, you must determine whether you want to use a default image, or a custom image to deploy the Windows operating system:

  • Default image A default image is the result of performing a standard installation of Windows 10 on a computer using default values. A default image, install.wim, is provided in the Sources folder on the Windows 10 product DVD. When using default images, remember that:
    • You don’t need to create the image.
    • You must apply settings and apps separately after deployment of the image.
    • Updates to applications don’t affect the image.
    • The same image can be used throughout the organization.
    • End-to-end deployment time is longer than with custom images because you must perform deployment tasks after image application.
  • Custom image A custom image is one that contains additional components, such as drivers and apps, and specific settings and customizations relevant for the organization. When using custom images, remember that:
    • You’ll need to create and maintain the image.
    • You can include all required apps and settings in the image.
    • You might need to maintain multiple images to manage the needs of your different departments.
    • Updates to applications require you to update the image.
    • End-to-end deployment time can be faster.

Note Thin Versus Thick

Images that contain only an operating system are often referred to as thin images, while those that contain many apps are called thick images. Most organizations use thin images because they require less ongoing maintenance.

MDT supports two types of images. These are:

  • Boot images These are used to start the deployment process. It’s fairly typical for computers targeted for deployment with MDT to have no installed operating system. This is known as bare-metal deployment. The boot image can be accessed from a USB thumb drive, a DVD or ISO file, or by using a Pre-Boot Execution Environment (PXE) server (such as Windows Deployment Services). When you deploy MDT, you’ll also install Windows ADK. This includes standard boot images for both x86 and x64 architectures.
  • Operating system images You’ll use the deployment workbench to create and manage your operating system images. As mentioned, you can use either a default or custom image, depending on your requirements.

Manage application and driver deployment – Deploy and upgrade operating systems

Manage application and driver deployment

You can use MDT to deploy and manage apps and drivers. To add applications, use the following procedure:

  1. In your deployment share, select and then right-click Applications.
  2. Select New Application.
  3. Complete the New Application Wizard by entering the following information:
  • Choose between Application with source files, Application without source files or elsewhere on the network, or Application bundle.
    • The details for the app, including Publisher, Application Name, Version, and Language.
    • The Source (where the files are for the app) and the Destination (the name by which the app is known).
    • Any command-line details needed to install the app. For example, for XML Notepad, the command line would typically be xmlnotepad.msi /q.

Exam Tip

If you want to deploy many apps, consider using a Windows PowerShell script to accelerate the process. You’ll need to import the MicrosoftDeploymentToolkit module.

Installing drivers is pretty similar:

  1. Select and then right-click the Out-of-Box Drivers folder.
  2. Select Import Drivers.
  3. Specify the folder location for drivers you want to import.

Create and use task sequences

After you’ve added all the required images, apps, and drivers, you must create task sequences to apply these to target computers. Task sequences are the collection of actions performed to complete a specific job, such as deploy Windows 10 and related apps to a target computer.

You use predefined templates to create your task sequences. Tasks typically include the following:

  • Gather This task reads required configuration information from a deployment server.
  • Format and Partition This task prepares the target hard disk for the operating system you’re deploying.
  • Inject Drivers This task obtains the required drivers for a target computer and downloads them from a driver repository.
  • Apply Operating System This task deploys the appropriate operating system image.
  • Windows Update This task connects to a WSUS server and retrieves updates to apply to the target computer.

To create a task sequence, use the following procedure:

  1. In your deployment share, select and then right-click Task Sequences.
  2. Select New Task Sequence.
  3. Complete the New Task Sequence Wizard by entering the following information:
  • A Task sequence ID and Task sequence name. These identify the task sequence, and together with optional Task sequence comments, are displayed by the deployment wizard during deployment.
    • Choose a template. You can choose between Sysprep and Capture, Standard Client Task Sequence, Standard Client Upgrade Task Sequence, Post OS Installation Task Sequence, and many others.
    • Choose the Operating Systems image.
    • If necessary, enter a product key.
    • Enter a user Full Name, Organization, web browser home page, and local administrator account password.

After you’ve created the task sequence, you’ll need to configure its settings. The procedure will vary based on what the task sequence does. But for example, to complete the process of configuring an operating system deployment task sequence, use the following procedure:

  1. In your deployment share, in the Task Sequences folder, right-click your task sequence and select Properties.
  2. Select the Task Sequence tab, displayed in Figure 1-13.

Figure 1-13 Reviewing the task sequence details

3. Verify and modify any required settings.

The final step before deployment is to configure the deployment share properties and related Windows PE settings. Use the following procedure:

  1. Right-click your deployment share and select Properties.
  2. On the General tab, verify the Platforms Supported (x86 and x64).
  3. Optionally, select the Enable multicast for this deployment share check box. This is only available if you’ve deployed a Windows Deployment Services role in your environment.
  4. On the Rules tab, review the contents of the displayed CustomSettings.ini file. These were defined in the initial task sequence creation.
  5. On the Windows PE tab, review the settings for creating a Windows PE boot disk. Remember to review the settings for your platform by selecting either x86 or x64 in the Platform list.
  6. On the Windows PE tab, beneath the Platform list, select the Features tab and review and revise required settings. These options determine additional features.
  7. Select OK, and if you made any changes, right-click your deployment share and select Update Deployment Share. Complete the wizard to refresh the settings in your deployment share.