Category Archive : Extract device hardware information

Manage application and driver deployment – Deploy and upgrade operating systems

Manage application and driver deployment

You can use MDT to deploy and manage apps and drivers. To add applications, use the following procedure:

  1. In your deployment share, select and then right-click Applications.
  2. Select New Application.
  3. Complete the New Application Wizard by entering the following information:
  • Choose between Application with source files, Application without source files or elsewhere on the network, or Application bundle.
    • The details for the app, including Publisher, Application Name, Version, and Language.
    • The Source (where the files are for the app) and the Destination (the name by which the app is known).
    • Any command-line details needed to install the app. For example, for XML Notepad, the command line would typically be xmlnotepad.msi /q.

Exam Tip

If you want to deploy many apps, consider using a Windows PowerShell script to accelerate the process. You’ll need to import the MicrosoftDeploymentToolkit module.

Installing drivers is pretty similar:

  1. Select and then right-click the Out-of-Box Drivers folder.
  2. Select Import Drivers.
  3. Specify the folder location for drivers you want to import.

Create and use task sequences

After you’ve added all the required images, apps, and drivers, you must create task sequences to apply these to target computers. Task sequences are the collection of actions performed to complete a specific job, such as deploy Windows 10 and related apps to a target computer.

You use predefined templates to create your task sequences. Tasks typically include the following:

  • Gather This task reads required configuration information from a deployment server.
  • Format and Partition This task prepares the target hard disk for the operating system you’re deploying.
  • Inject Drivers This task obtains the required drivers for a target computer and downloads them from a driver repository.
  • Apply Operating System This task deploys the appropriate operating system image.
  • Windows Update This task connects to a WSUS server and retrieves updates to apply to the target computer.

To create a task sequence, use the following procedure:

  1. In your deployment share, select and then right-click Task Sequences.
  2. Select New Task Sequence.
  3. Complete the New Task Sequence Wizard by entering the following information:
  • A Task sequence ID and Task sequence name. These identify the task sequence, and together with optional Task sequence comments, are displayed by the deployment wizard during deployment.
    • Choose a template. You can choose between Sysprep and Capture, Standard Client Task Sequence, Standard Client Upgrade Task Sequence, Post OS Installation Task Sequence, and many others.
    • Choose the Operating Systems image.
    • If necessary, enter a product key.
    • Enter a user Full Name, Organization, web browser home page, and local administrator account password.

After you’ve created the task sequence, you’ll need to configure its settings. The procedure will vary based on what the task sequence does. But for example, to complete the process of configuring an operating system deployment task sequence, use the following procedure:

  1. In your deployment share, in the Task Sequences folder, right-click your task sequence and select Properties.
  2. Select the Task Sequence tab, displayed in Figure 1-13.

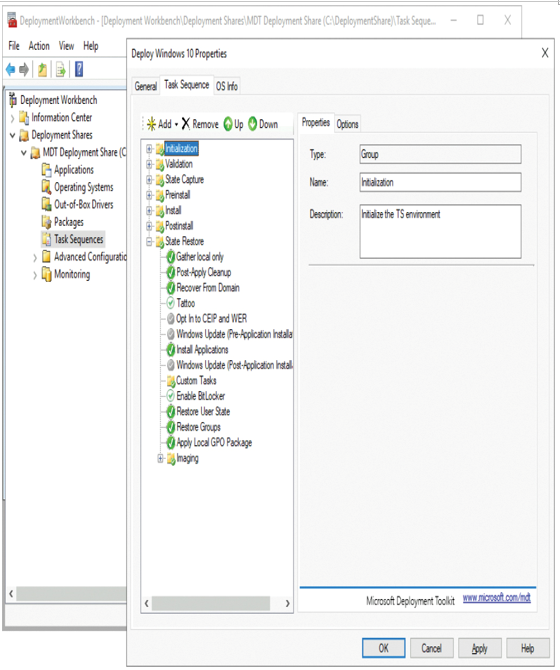
Figure 1-13 Reviewing the task sequence details

3. Verify and modify any required settings.

The final step before deployment is to configure the deployment share properties and related Windows PE settings. Use the following procedure:

  1. Right-click your deployment share and select Properties.
  2. On the General tab, verify the Platforms Supported (x86 and x64).
  3. Optionally, select the Enable multicast for this deployment share check box. This is only available if you’ve deployed a Windows Deployment Services role in your environment.
  4. On the Rules tab, review the contents of the displayed CustomSettings.ini file. These were defined in the initial task sequence creation.
  5. On the Windows PE tab, review the settings for creating a Windows PE boot disk. Remember to review the settings for your platform by selecting either x86 or x64 in the Platform list.
  6. On the Windows PE tab, beneath the Platform list, select the Features tab and review and revise required settings. These options determine additional features.
  7. Select OK, and if you made any changes, right-click your deployment share and select Update Deployment Share. Complete the wizard to refresh the settings in your deployment share.

Deploy images – Deploy and upgrade operating systems

Deploy images

After you’ve completed the process of creating and configuring your task sequences, you’re ready to deploy your images. All you need to do is start the required computers, and they should start up using the MDT PE. Then use the following procedure to apply the image and deploy Windows 10. Note that steps might vary based on your specific configuration options:

  1. Turn on your target computer.
  2. The Microsoft Deployment Toolkit deployment wizard starts.
  3. As displayed in Figure 1-14, select Run the Deployment Wizard to install a new Operating System.

Figure 1-14 Deploying Windows 10 using an MDT task sequence

  1. Enter your User name, Password, and Domain and select OK.
  2. On the Task Sequence page, select the appropriate task sequence and select Next.
  3. On the Computer Details page, review the generated computer name, and then select either Join a domain or Join a workgroup. For the domain option, enter the Domain to join, Organizational Unit, and credentials to join (User Name, Password, and Domain). Select Next.
  4. Complete the Windows Deployment Wizard by entering the following information:
  • Choose whether to move user data and settings from a previous version of Windows.
    • Choose whether to restore user data.
    • Specify the Language Settings and Time Settings.
    • Select any apps you want to deploy.

8. When you’ve completed the required settings, select Begin. Your operating system and selected apps are deployed.

Need More Review? Deploy a Windows 10 Image Using MDT

To review further details about deploying images with MDT, refer to the Microsoft website at https://docs.microsoft.com/windows/deployment/deploy-windows-mdt/deploy-a-windows-10-image-using-mdt.

Monitor and troubleshoot deployment – Deploy and upgrade operating systems

Monitor and troubleshoot deployment

If you experience problems with deployment by using MDT, review the configuration settings for your deployment share. If you’re confident that everything is properly configured, then you can consider reviewing MDT logs. Each MDT script automatically generates logs.

Depending on the type of deployment you’re performing, after deployment, the log files are moved to either:

  • %WINDIR%\SMSOSD
  • %WINDIR%\TEMP\SMSOSD

For LTI deployments, the logs are moved to:

  • %WINDIR%\TEMP\DeploymentLogs

Table 1-15 describes the available MDT logs.

TABLE 1-15 MDT logs

LogDescription
BDD.logCopied to a network location at the end of the deployment. You must specify the SLShare property in the Customsettings.ini file in order to create this log.
LiteTouch.logCreated during LTI deployments and stored in the %WINDIR%\TEMP\DeploymentLogs folder.
Scriptname*.logCreated by each MDT script. The log name is the same as the script name.
SMSTS.logCreated by the Task Sequencer. Describes all Task Sequencer transactions. Stored in %TEMP%, %WINDIR%\System32\ccm\logs, C:\_SMSTaskSequence, or C:\SMSTSLog depending on your specific deployment scenario.
Wizard.logCreated and updated by the deployment wizards.
WPEinit.logCreated during the Windows PE initialization process. This log is useful for troubleshooting errors encountered when starting Windows PE.
DeploymentWorkbench_id.logCreated in the %temp% folder when you specify a /debug when you start the Deployment Workbench.

Exam Tip

The MDT log file format is designed to be read by CMTrace.

When you investigate the logs, you’ll want to identify any errors. There are numerous error codes with specific meanings. For example, error codes 5201, 5203, and 5205 all mean that a connection to the deployment share could not be made, and deployment cannot proceed.

Need More Review? Error Codes and Their Descriptions

To review further details about error codes with MDT, refer to the Microsoft website at https://docs.microsoft.com/troubleshoot/mem/configmgr/troubleshooting-reference#table-1-error-codes-and-their-description.

Need More Review? Troubleshooting Reference for MDT

To review further details about troubleshooting MDT, refer to the Microsoft website at https://docs.microsoft.com/troubleshoot/mem/configmgr/troubleshooting-reference.

Azure AD Password Protection – Deploy and upgrade operating systems

Azure AD Password Protection

Azure AD Password Protection offers a method to reduce the risk posed by your users choosing commonly used and compromised passwords for their access passwords. Using the password protection feature, administrators can populate a custom banned list of up to 1,000 passwords that users will be blocked from using. Also, you can choose to use the global banned password list.

Passwords that are deemed too common are stored in what is called the global banned password list. Cybercriminals also use similar strategies in their attacks. Therefore, Microsoft does not publish the contents of this list publicly. Administrators can use either a global banned password list or create a custom banned password list, which can contain lists of vulnerable passwords, such as the organization’s products, variants of their brand names, and company-specific terms. These can be blocked before they become a real threat.

The Azure AD Password Protection minimum licensing requirements are shown in Table 1-17.

TABLE 1-17 Azure AD Password Protection licensing

Deployment scenarioAzure AD password protection with global banned password listAzure AD password protection with custom banned password list
Cloud-only usersAzure AD FreeAzure AD Basic
User accounts are synchronized from on-premises Windows Server Active Directory to Azure AD.Azure AD Premium P1 or P2Azure AD Premium P1 or P2

To configure Azure AD Password Protection for cloud-based accounts, perform the following procedure:

  1. Open the Azure Active Directory admin center (at https://aad.portal.azure.com) and sign in with a global administrator account.
  2. Navigate to the Security section and select Authentication methods.
  3. On the Authentication methods page, select Password protection.
  4. Under Custom banned passwords, select Yes for the Enforce custom list option.
  5. In the Custom banned password list displayed in Figure 1-15, enter a list of word strings. The words can have the following properties:

Figure 1-15 Azure AD Password protection

  • Each word should be on a separate line.
    • The list can contain up to 1,000 word strings.
    • Words are case insensitive.
    • Common character substitutions (such as “o” and “0” or “a” and “@”) are automatically considered.
    • The minimum string length is four characters, and the maximum string length is 16 characters.

6. After you have added the word strings, select Save.

When users attempt to reset or update a password using a banned password, they see the following error message:

Click here to view code image

Choose A Password That’s More Difficult For People To Guess.

Azure AD Password Protection is also available for hybrid scenarios. To extend the banned password lists to your on-premises users, you need to install two components—one on your domain controllers and another on a member server, as follows:

  • Azure AD Password Protection Proxy service Installed on a member server. Forwards password policy requests between your domain controllers and Azure AD.
  • Azure AD Password Protection DC Agent & DLL Installed on your domain controllers. Receives user password validation requests, and processes them against the local domain password policy.

When users and administrators change, set, or reset passwords on-premises, they will be forced to comply with the same password policy as cloud-only users.

Note Azure AD Password Protection for Windows Server Active Directory

You can download the components required to configure Azure AD Password Protection for on-premises scenarios together with the full installation documentation at https://docs.microsoft.com/azure/active-directory/authentication/concept-password-ban-bad.

Configure Azure MFA – Deploy and upgrade operating systems

Configure Azure MFA

To enable Azure MFA for a single cloud-based Azure AD user, you must configure the MFA Service Settings. Then you can create a conditional access policy by using this procedure:

  1. Open the Azure Active Directory admin center (at https://aad.portal.azure.com) and sign in with a global administrator account.
  2. On the Overview blade, under Manage, select Users.
  3. On the menu bar, select Multi-Factor Authentication. A new browser windows opens.
  4. On the multi-factor authentication page, select the service settings tab.
  5. Under verification options, select all the boxes for Methods available to users (Call to phone, Text message to phone, Notification through mobile app, Verification code from mobile app or hardware token).
  6. Select Save.
Create a Conditional Access Policy for MFA

Once MFA settings have been configured, you need to assign them to users by creating a conditional access policy:

  1. In the Azure Active Directory admin center, under favorites, select Azure Active Directory.
  2. Select Security, and then select Conditional Access.
  3. Select New policy.
  4. On the Conditional Access Policy blade, provide a name for your policy.
  5. Under Assignments, select 0 users and groups selected.
  6. Choose between including and excluding specific users, groups, directory roles, and all guest and external users. For example, select Directory roles; then, in the drop-down list, select Global administrator.

Note Don’t Lock Yourself Out

Creating restrictive policies in conditional access for the global administrator account requires caution. Ensure you don’t configure settings that result in you locking yourself out.

  1. Under Cloud apps or actions, select the No cloud apps, actions, or authentication contexts selected link, and then choose the cloud apps or actions you want to protect with MFA. For example, select Microsoft Intune.
  2. Under Conditions, select the 0 conditions selected link, and configure the required settings. For example, select High and Medium Sign-in risk.
  3. Under Access controls, select the 0 controls selected link, ensure the Grant access radio button is selected, and select the check box for Require multi-factor authentication, as displayed in Figure 1-18.

Figure 1-18 Creating a conditional access policy to require MFA

  1. Click Select.
  2. Under Enable policy, toggle the setting to On.
  3. Select Create.
  4. The policy is validated, and it appears in the Conditional Access Policies blade as Enabled.

After you have enabled Azure MFA, you can test it to ensure that the conditional access policy works. Test logging in to a resource, such as the Microsoft Endpoint Manager admin center, with a user who has MFA enabled, and verify that the user is required to provide additional authentication to access the resources.

Note Azure MFA For Administrators

Microsoft offers basic Azure MFA features to Office 365 and Azure AD administrators for no extra cost. All other users require Azure AD premium licensing.